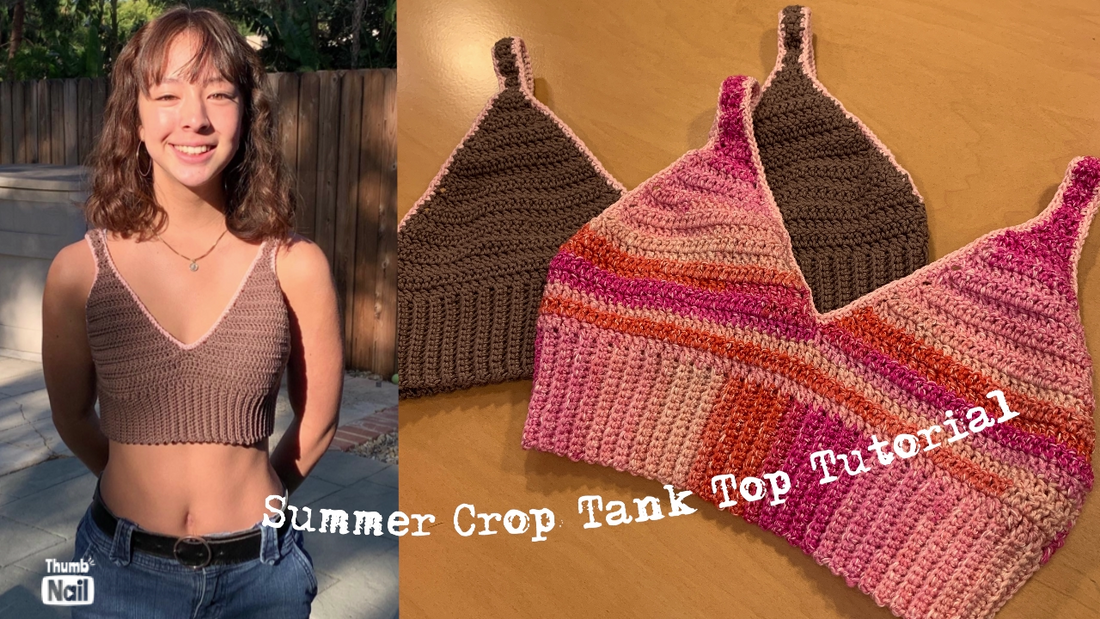
Summer Crop Tank
I don't know about where you live, but it is super hot here in Los Angeles. Summer clothes is out in full-force and this is a quick, easy, VERY cute crop top that is comfortable and trendy.
I made one for Aubrey and she wore it to school. I was pretty excited that it was a hit.
This is also a perfect advanced beginner project, especially if it's your first piece of clothing.
Here's the pattern and you can also follow along on my two-part, detailed tutorial on YouTube!
You'll need:
Weight 4 yarn (cotton or cotton blend)
3.5mm crochet hook
This top works from the bottom going up, starting with a ribbed band.
Ribbed Band:
Ch 16. Sc into 2nd ch from hook. Sc to end. Turn.
Ch1, sc in back loops only across the row. Turn.
Repeat this row over and over again until it’s long enough to go all the way around your torso, where you want it to be – you can modify the body of this top easily to crop it more or less… or not at all!
A ribbed band will stretch so remember to allow for this – you don’t want to make it too long, or the fit will be too loose. Better to make the band a tad too tight than too loose. I suggest testing it around the area on your body, where you want it to fall, before moving on to the next step J
When the band is long enough, continuing with the same yarn, slip stitch the ends together (the first row you made to the last row you made). Turn right side out, so the seam you just made is on the inside.
BODY:
Continuing with the same yarn…
Ch3 and dc all the way around the long edge of the band.
I made 126 rows in the band so I did 126 dc along the edge.
At the end of the row slip stitch into the top of the ch3 and turn your work.
Repeat this last row TWO more times for a total of 3 rows around the body. Remember to slip stitch, ch3, and turn at the end of each row.
OR
this is a great place to modify if you want a longer top (less cropped). Just add more rows, to make it easy to follow these instructions (and the YouTube video) make an ODD number of rows.
TIP! Be sure to test the size on whoever will be wearing the garment, as we all have our own crochet style – tighter or looser – so my numbers might not be the right fit for you!
Front of Top:
To find out how many stitches you need for the front area of the top you are going to half whatever number of stitches you had in the last row that you completed. For me I had 126 stitches so half that number is 63. HOWEVER, I’m going to halve that number again later, so I’m going to go with 64 for an even number.
With yarn still attached, ch3 (counts as first dc), dc into the next 63 sts (or whatever number you have). Turn.
RIGHT CUP:
To find out where to place your cups you are going to divide the front part of your top into 2 again. For me I had 64 sts so half that is 32. Place a stitch marker into the 32nd stitch (or whatever your half number is) in from the right. This will mark the center of the cups.
Now, ch3 (counts as first dc), dc2tog, dc into each st until you have 2 remaining before the stitch marker.
In those last 2 sts before the stitch marker, dc2tog. Then dc into the stitch that has the stitch marker. Stop there, ch3 and turn.
For the next row and every row after that you are going to ch3 (count as first dc), then dc2tog, then dc into every st until 3 sts remain, dc2tog, then dc into last st (top of the ch3). You will see the triangle shape take form. Keep repeating this row until 3 sts remain at the top.
STRAP:
For the next 22-32 rows (modify for your own fit!) you are going to do 3 dc WITHOUT a turning chain and turn, over and over until you have the length you want. This will be the strap.
You should put the top on you to find out exactly how many rows you need for the strap to go around your shoulder and reach the back part of the top. Once it’s long enough slip stitch or sew the strap to the back of the top.
Now lay the top down on a flat surface with the front facing you and attach yarn next to the cup you just completed, in the same center stitch. Ch3 (counted as first dc), and make 32 dc (or whatever number you have). Repeat the same steps as for the other cup and strap.
BORDER (optional):
Sc all the way along the edges of the arm holes and along the inside of the straps, along back and front. Check out my YouTube channel for a full, detailed 2 part tutorial J
Thank you for checking out my blog and if you make this top, please tag me on Instagram: @theotheramyanderson
Here is what I used in this tutorial and the sample shown**
This is the Lion Brand Ice Cream Cotton Blend Yarn I use in this video: https://amzn.to/3zXSdeQ
If you want to use a 100% cotton like I did for Aubrey's brown top, these are the Lion Brand 24/7 Cotton Yarn colors I used:
Café au Lait https://amzn.to/3OxhjFl
Pink Lemonade (this is what I used for the border in the tutorial, too) https://amzn.to/3xMIg14
Comfort Grip Hook Set - my favorite hooks: https://amzn.to/3xAlg6F
**This list includes Amazon affiliate links. You do not pay any extra for purchasing through these links, but I do earn a very small amount that help me support this channel.
Great job! Keep learning and let's make some stuff!
xo Amy